


Epoxy has several advantages over other adhesives and fillers. It can fill gaps and still retain strength, it's waterproof, and it sticks well to most surfaces. Read the label to choose a filling epoxy that matches the repair you're attempting. Here are some useful tips on how to use epoxy resin.
How to Use Epoxy Resin Like a Pro on Any Surface
1
/
11

What is Epoxy?
Boat builders, surfboard makers and fabricators of all kinds use epoxy every day to form strong, waterproof, lightweight structures. And you can take advantage of this versatile group of products around the home, too. Epoxy for household use is available in liquid, gel, two part epoxy resin and putty and in containers ranging from a mere half ounce to gallons.
Unlike many other adhesives and fillers that require drying time, epoxies require two parts that, when mixed, begin a chemical reaction that causes the liquid or putty to harden. The amount of time you have to work with the two part epoxy resin before it sets up is determined by the chemistry of the hardener. For tiny jobs, you can choose one-minute epoxy, but in general, epoxy that takes longer to set also forms a stronger bond, not to mention giving you more working time.
2
/
11

Repair Chipped Furniture
When it would be difficult or impossible to replace missing veneer or chipped furniture parts with real wood, epoxy putty makes a great substitute. Two-part putty in a Tootsie Roll shape is convenient to use and makes a strong repair. Just slice off a section and knead the chunk until the two parts are blended and the color is consistent. Then form the putty into approximately the right shape and press it into the damaged area. Use a wet putty knife to smooth and shape the putty. When the epoxy has hardened to about the consistency of bar soap, carve or scrape off most of the excess. When it hardens completely, you can sand it just like wood.
3
/
11

Fix Loose Joints With Epoxy Resin
Epoxy is one of the few adhesives that can fill gaps without losing strength. That's why it's perfect for repairing loose-fitting joints in furniture. If you have only one or two repairs to make, buy a small quantity of epoxy in a double syringe at a home center or hardware store. Read the instructions on the label and make sure the epoxy is formulated for wood repairs.
Brush a layer of epoxy onto both parts to be joined. Assemble and clamp the parts if necessary. Then wait the specified time for the epoxy to set up. Read the instructions to determine how long the epoxy should cure before you use the furniture. Even five-minute epoxy may take an hour or more to reach full strength. If you're repairing a valuable antique, you may want to avoid epoxy repairs because the result is irreversible.
4
/
11

Mix It Up in a Can Bottom
If you only need a bit of two part epoxy resin for a small repair, you can't beat the bottom of an aluminum can as a mixing container. Just squeeze two-part epoxy into the concave can bottom and mix it up.
5
/
11

Buy Some Epoxy Pumps
The pumps shown are calibrated so that one pump from each, the resin and the hardener, gives you exactly the right proportion. No more measuring cups or guesswork. And with this setup, it's super convenient to mix a batch of epoxy whenever you need it. The cost of a quart of resin, a pint of hardener and the pumps is a little steep, but the epoxy will last for years, and a fresh batch of epoxy is just a few pumps away. Make sure to buy pumps that are calibrated for the epoxy you're using.
6
/
11
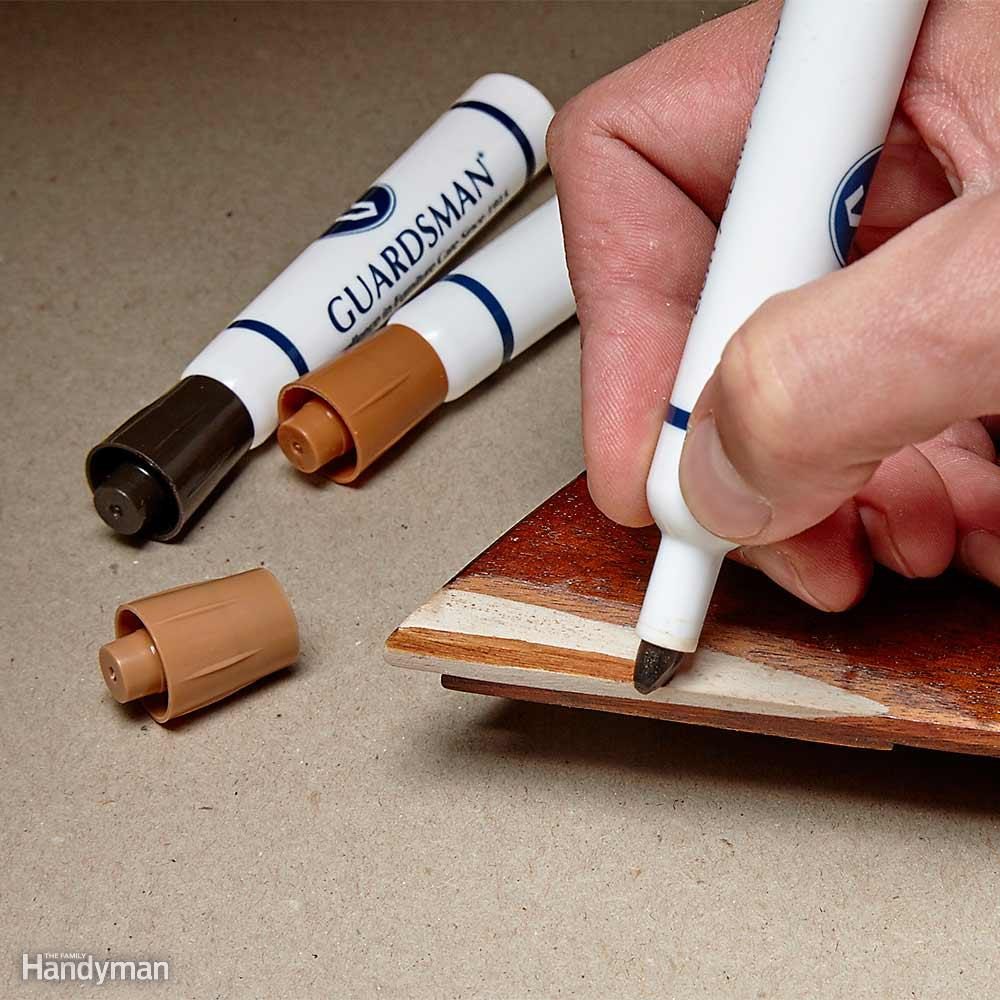
Color Epoxy Repairs With Stain Markers
Epoxy putty is a handy material for repairing chipped wood or a bit of missing veneer, but if the wood is stained rather than painted, you'll have to blend the repair to make it match. Stain pens work great as a quick way to color an epoxy repair. Start with a lighter base color to match the background. Then add darker colors over the top if needed. Stain markers are available at home centers, hardware stores and paint stores. For an even more realistic repair, simulate wood grain by making tiny slits in the epoxy with a razor blade before it's fully hardened.
7
/
11

Conserve Epoxy by Prefilling With Wood
Epoxy putty is expensive, so when you run into deep holes or large areas to fill, start by filling most of the repair with wood. Cut a piece that's small enough to allow a layer of epoxy over the top. Then adhere it by pressing it into a bed of epoxy putty. You don't have to wait for this epoxy to set. You can finish the repair with more epoxy putty right away.
8
/
11

Replace Rotted Wood With Epoxy Putty
For small repairs, you can use the kind of epoxy putty that comes in a two-part roll. But there's a better choice for repairing larger areas of rotted or damaged wood. Abatron WoodEpox and J-B Weld Wood Restore are two examples of two-part epoxy wood repair putty. Mixing parts A and B according to the instructions results in a soft, easily formed putty that you can use to rebuild rotted or damaged wood. For a strong repair, first soak the wood fibers with liquid epoxy to consolidate and firm up loose fibers and create a primer for the putty. Buy epoxy putty and liquid epoxy online or at home centers and hardware stores.
9
/
11

Speed It Up With Heat
When you're working with epoxy in lower temps and need to speed things up, a hair dryer does wonders. Warm up the two parts of the epoxy before mixing or warm up the epoxy after it's applied. You can even warm up the surface you're applying the epoxy to. The heat speeds up the reaction for a quicker cure.
10
/
11

Spread It Out to Slow It Down
Epoxy heats up as the two parts react after mixing. The heat speeds up the reaction, giving you less time to work. To avoid this problem, spread your epoxy thin after mixing it. This tip works with liquid epoxy too. Wide, shallow mixing vessels are preferable to deep, narrow vessels to greatly slow down the hardening reaction. It works because the epoxy then has more surface area exposed to release heat.
11
/
11

Try Epoxy in a Tube for No-mix, No-sag Repairs
This tube of epoxy is divided down the middle to separate the resin and hardener. To use it, you install the special tip and put the tube in a caulk gun. The two parts mix in the tip as you dispense the epoxy. The thickened epoxy doesn't sag or run, so it's great for working on vertical surfaces. It's also easy to smooth with a putty knife, which makes it handy for repairing things like cracked siding boards. This West System Six10 Epoxy Adhesive is available online or where boat repair supplies are sold. Remember to buy extra mixing tips if you don't think you'll use the entire tube within about 30 minutes.