


Stop fluorescent lights from flickering and humming with a new ballast.
An hour or less
Beginner
$51–100
Introduction
Replace the ballast when your fluorescent light flickers or makes an annoying hum. The repair will only take about 10 minutes.
When your fluorescent light flickers or makes a loud and annoying hum, a degrading ballast could be the cause. Replacing a ballast is easier than you think, but ballasts can be expensive, so consider pricing a brand-new fixture for comparison. Also, know that fluorescent technology is being phased out in favor of light-emitting diodes (LED), so if you’re upgrading, consider replacing the fixture with an LED instead. If you want to keep the fluorescent, you can find a new ballast at a hardware store or home center and install it in about 10 minutes.
What Is a Fluorescent Light Ballast?
A fluorescent ballast takes in electricity and then regulates current to the light bulbs or tubes, stabilizing the output of the light. This is what makes the light stay lit, so a fluorescent light requires a ballast in order to work. Without it, the current would increase as it passed through, ruining the lamp (bulb).
Fluorescent ballasts come in two broad types: magnetic and electronic. Magnetic ballasts are increasingly obsolete, but the good news is that a typical ballast will last about 20 years—you won’t have to replace them very often. (Although cold environments and bad bulbs can significantly decrease the lifespan of the ballast.)
Check the specifics of the ballast to determine how many lamps they can regulate at once, as well as what kind of lamps they’re compatible with. If you’re replacing a magnetic ballast with an electronic one, it’s important to follow the wiring diagram on the new ballast, as it may be different than the existing one.
Replace a fluorescent light ballast in four steps.
Tools Required
- 4-in-1 screwdriver
- Nut driver
- Wire stripper/cutter
Materials Required
- New ballast
- Wire connectors
Project step-by-step (5)
Step 1
Remove the Bulbs and Fluorescent Light Fixture Cover
- Unplug the fixture or turn off the power at the main panel.
- Remove the diffuser (cover), then carefully remove the fluorescent bulbs or tubes.
- Remove the fluorescent ballast compartment cover to expose the internal wiring and ballast.
- Note: The attachment method for ballast covers varies widely among manufacturers. It may be attached with nuts or clips or simply snapped into place.

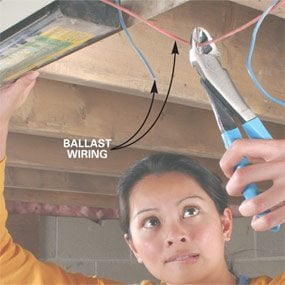
Step 2
Cut the Old Ballast Wiring
- Use a non-contact voltage tester to verify the power is off to every wire in the fixture.
- Snip the old fluorescent ballast wiring several inches from the end of the fluorescent ballast with side-cutting pliers or wire snips.
- Note: There could be four to eight wires coming out of the ballast: a black and white power supply, and blue, red and/or yellow connections to the lamps.
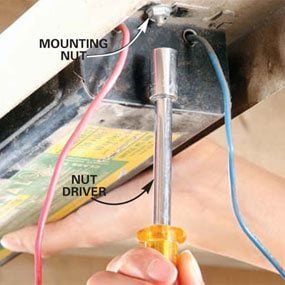
Step 3
Unscrew the Old Ballast
- Unscrew the ballast mounting nut(s) or other attachment mechanism and drop the old ballast free.
- Hold onto the ballast with your free hand to keep it from falling out.
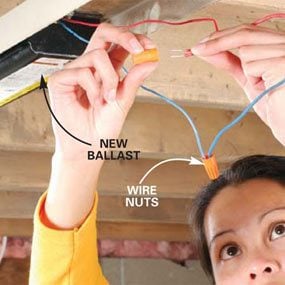
Step 4
Install the New Ballast
- Mount the new ballast in the fixture.
- Strip the electrical wiring back 1/2 inch.
- Connect the power supply and lamp conductors according to the wiring diagram using wire connectors.
- Replace the ballast compartment cover and bulbs.
Buying a New Ballast
Take the old ballast to the store with you. Compare the new and old ballasts to verify that the wiring diagrams, voltage and current match before installing the new ballast.
Step 5